I had written this long post laying out the details of my terrible horrible day (week/err longer) and then as i was spell checking somehow it all got deleted..... and command z wouldn't work
just one more thing to go wrong today
its okay you wouldn't have wanted to read it anyways because it was so whiny
i give up, i am going to bed
Wednesday, September 26, 2012
Saturday, September 15, 2012
Two weeks down...
34 to go!!
Our homeschooling campaign has gotten off to a swell start!!
This week was not as happy and perfect as last week, there are some concerns. Firstly i believe it is my fault for this week being more difficult. When mommy starts to lose focus, then every one is off task! Secondly it is not my fault that this week was more difficult, it was the MICE. Em Eye See Ee!!!! meaning more than one... 4 to be exact, and where there are 4 mice there are bound to be many many more ::shivers at the thought:: With the discovery of our mouse problem, i set out to rid my house of all things potentially food for mice, and potentially touched by mice.
Since cleaning in the afternoon, for me. is like trying to crack an anvil with a nail file(in case you have never tried to accomplish this metaphor... tedious and unrewarding, and most definitely impossible is what i am trying to say) i insisted on cleaning in the mornings... every morning, and quite systematically ridding my house of filth!!! There are deep cleanings... and then there are mouse cleanings and those take much longer and require my hands to become extra sore and chapped and cracked.
Then there were other peoples agendas, to contend with.... like the exterminator, and the siding guy, and political phone calls, and tracking my lost snapfish package, and of course the survey for talking to the usps, all these things happen when i need to be schooling. The children and i are finally sitting at the table the baby is in a good mood, we are making progress, and the phone rings... i pick it up... oldest son walks out of the room, daughter starts digging though her crayon box, instead of doing her math, youngest one starts screaming because some one walked out of the room, i end my 2-3 minute phone call.... have to find my place... have to coral every one back to the table.... get their attention again... cuddle baby again... and by this time it is snack time.... then i am frustrated
Simple solution: this week no phone calls during home school
Now onto the next problem, i am so gosh darn tired!!!!! this problem is not as easily fixed, i think mostly it had to do with the mice keeping me awake, and the three children in my bed all week because i was afraid the mice would eat them, so hopefully this week i will be less apt to falling asleep during story time.... and yes i didn't fall asleep during story time ONCE.... i fell asleep TWICE, two different days... its not like these stories are really lengthy either. i am just so exhausted!!!!
Simple solution: this week early bed time for mommy
Next problem, kinda piggy backs onto the last problem. We as a family are not getting started early enough... in other words we are sleeping in to late!! If we could get up an hour and a half earlier we will be finishing at about lunch time... which would mean that lunch would not feel like a huge obstacle in our day, but more like a timely ending to our school and we can all nap afterwards!!! ahhhhhhhhhh napping, i just love the idea, even the word sounds soothing and enjoyable!! Napping
 So homeschooling prognosis, still not so bad, i think we are still doing good, just have to iron out a few wrinkles!!
 I have decided homeschooling for a mother is like the worst of all worlds, it is like being a work at home mother, except your kids never leave and you dont get adult interaction, and you dont get paid, and your house gets extra messy, and you still dont have time for dinner but you also had to make a full lunch and breakfast so the dishes are piling up already!
But at the same time i love seeing my kids all day and watching them grow, and schooling a kindergartner is not much different from just being a stay at home mom, we already had "school" time before, just now it counts, and we have to do it on a schedule, and i don't have to make up our lessons(thank you calvert!!) and we have been doing such fun things, it is so rewarding, and i wouldn't change a thing!!
.... except for the mice
 |
| playing dress up to lean fastening skills |
Our homeschooling campaign has gotten off to a swell start!!
 |
| he enjoyed putting on daddy's clothes |
 |
| computer class, her favorite subject i get asked every day if computer is today |
 |
| and when you complete a computer skills corse, then give you a certificate! |
Then there were other peoples agendas, to contend with.... like the exterminator, and the siding guy, and political phone calls, and tracking my lost snapfish package, and of course the survey for talking to the usps, all these things happen when i need to be schooling. The children and i are finally sitting at the table the baby is in a good mood, we are making progress, and the phone rings... i pick it up... oldest son walks out of the room, daughter starts digging though her crayon box, instead of doing her math, youngest one starts screaming because some one walked out of the room, i end my 2-3 minute phone call.... have to find my place... have to coral every one back to the table.... get their attention again... cuddle baby again... and by this time it is snack time.... then i am frustrated
 |
| schooling at the park |
Simple solution: this week no phone calls during home school
Now onto the next problem, i am so gosh darn tired!!!!! this problem is not as easily fixed, i think mostly it had to do with the mice keeping me awake, and the three children in my bed all week because i was afraid the mice would eat them, so hopefully this week i will be less apt to falling asleep during story time.... and yes i didn't fall asleep during story time ONCE.... i fell asleep TWICE, two different days... its not like these stories are really lengthy either. i am just so exhausted!!!!
 |
| he wanted lots of tape for his project |
Simple solution: this week early bed time for mommy
 |
| found a praying mantis on the outside of the window |


 |
| its hard AND funny trying to balance paper figures on a string |
But at the same time i love seeing my kids all day and watching them grow, and schooling a kindergartner is not much different from just being a stay at home mom, we already had "school" time before, just now it counts, and we have to do it on a schedule, and i don't have to make up our lessons(thank you calvert!!) and we have been doing such fun things, it is so rewarding, and i wouldn't change a thing!!
.... except for the mice
 |
| i sure do love that little face!! |
Mei Tai Tutorial
All I wanted was a Babyhawk mei tai... well not for 150 smackaroos... THEN all i wanted was a babyhawk pattern... well that wasnt available.... SO THEN what i wanted was $150..... but i just cant spare it for another baby carrier.... but I NEED to go letterboxing and i cant do that without a baby hawk!!
Sew the body of the Mei Tai:
Sew the top two straps:
Sew the waist strap:
Attaching waist Straps:
Attach the top straps:
Adding the back rest: ALMOST DONE!!!
Grab a happy baby and test it out:
Of course there are other mei tai's out there, some with patterns some cheaper... but those all have one big problem, that i cant get past... they arent Baby hawks!!!
The solution to my dilemma was to make one, and write a tutorial for all those other penny pinching babywearing momma's on the edge out there!!!
Here it is, a reversible baby carrier with all the style of a baby hawk.... lots and lots of pictures, but that is only because i broke it down so much... it is all so simple its scary(the last step is a little on the tricky side) so relax i did all the figuring out for ya, alls you gotta do it make it.
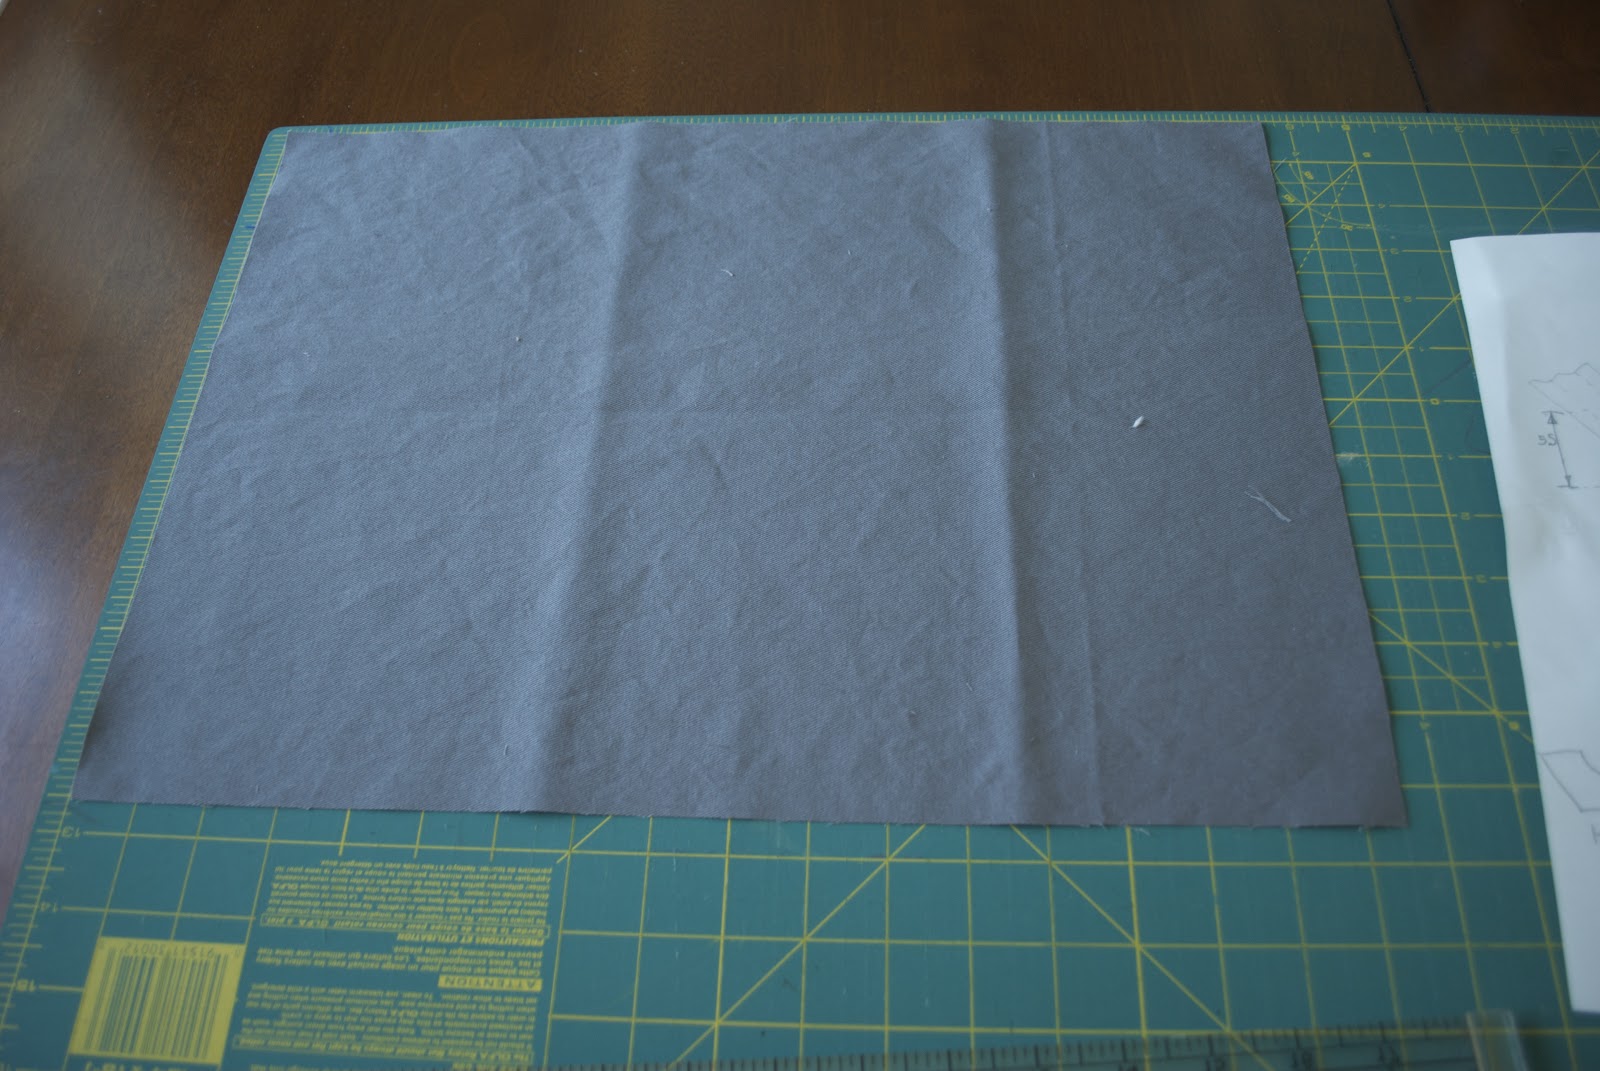
Lets get started!! Step One: find some coupons, head out to your local craft store, and buy 2 1/2 yards of cotton twill and a half yard of a patterned material (i used duck for its stability and durability, no need for an extra liner)
Prepare/Cut Fabric:
Prepare/Cut Fabric:
 |
| Prewash and dry your fabric... i hate doing this, but for this project it is a must! |
 |
| now iron it all... also something i HATE to do, but you must do it |
 |
| Cut out your pieces like this: Primary color: (cut down the length of the 2 1/2 yards) 3- 70" X 8.5" (straps) 2- 6" X 18" (body piece A) 1- 12.5" X 18" (body Piece B) (You can also make body piece B a patterned piece but for husbands sake i used grey) 1- 12.5 X 17.5" (head rest) Patterned Color: 1- 12.5" X 18" (body piece C) |
 |
| take your head rest square and lay it out flat |
 |
| fold it in half length wise |
 |
| then fold it in half long wise, then cut an angle on the top left corner that is 2 inches in and three inches down from the top |
 |
| it should look like this unfolded |
 |
| cut some batting 1/2 inch smaller all the way around |
 |
| Sew(right sides together) body piece A to B, and body piece A to C ( i surged the seams after i sewed them, but still left the half inch seam allowance for added security) |
 |
| sew both piece together with right sides facing each other, until you make a tube, the should be in the order of A,B,A,C |
 |
| iron the tube so that the two A pieces are folded in half, and the seams are matched |
 |
| iron the seams so that when put together they are facing opposite directions... for easier sewing and a less bulky look |
Sew the top two straps:
 |
| fold and sew two "strap" pieces in half right sides together, sew an angle on one end, and leave the other end open. Snip the corner so it lays flat when turned |
 |
| turn right side out... with a broom handle, it helps!!! |
 |
| iron... I know i HATE ironing too, but you HAVE to do it... so buck up and do it |
 |
| i used foam for this part, cause i wanted it extra cushy, but you can use a folded piece of batting. Cut it to 3 inches wide and 18 inches long |
 |
| stuff into your straps, i hat to turn mine inside out up to where i wanted the foam and pull it over the foam like putting on a pair of stockings |
 |
| make sure there is about 3 inches of fabric on the end before the foam starts, and then sew all the way down the foam plus and inch on each side... I sewed 1 inch in from each side of the strap. |
 |
| Fold you third strap in half, and the body of your mie tai in half, and line up the folded edges, mark/pin where the end of your mie tai is... you will be sewing up to these pins, so that the body of your mei tai can slide in. |
 |
| make sure to mark both layers |
 |
| sew up to your pins |
 |
| flip right side out and then iron 1/2 inch fold in the un sewn section |
 |
| slid the body piece in 1 1/2 inches |
 |
| Pin... I know I KNOW, you hate pinning... me too... just tell yourself it will be worth it in the end! |
 |
| use the triple stitch setting for this top stitching |
 |
| sew it twice, very close to the top/opened edge of the waist strap |
 |
| lay you body piece with waist strap attached onto your cutting board and measure how tall it is, cut it to 2 inches below your desired height (my desired height was 21 inches i cut it to 19 inches) then cut angles on each side 2 inches in from the side and 3 inches down from the top... refer to picture |
 |
| pin straps on, with foam even with angled sides |
 |
| i messed up here... but i will try and tell you what you should do, put your ruler a half inch down from the bottom point of your angled cut and trim the strap off at that line... then sew a box, with an X in it to reinforce the straps |
 |
| box with X... yours will look different, cause you will have done it right!! |
 |
| line you back rest with batting (it doesn't matter what kind, i would recommend against high loft, it is all i had on hand and it was quite difficult to work with) quilter spray adhesive will make your life much much easier!! fold your edges about a half inch over the batting on all sides |
 |
| lay your mie tai on top of the back rest and fold it in half over your mie tai,matching the angle of your back rest with the angle of your straps, and pin the dickens out of it!!! |
 |
| pin carefully matching the folded edges nicely... you can fold the angled cut of the body piece in towards the center of the mie tai, so that it wont stick out o the back rest |
 |
| sew carefully around the angle sides and bottom of the back rest. starting from one side and ending at the other... do not sew the folded top edge(unless you really want to i suppose) |
 |
| mark three lines across the back rest |
 |
| sew them from one end to the other, go from the same end and the same direction each time, so as to avoid bunching! |
 |
| baby three wasn't to happy, and didn't want to be attached to mommy in this way... he had other things in mind |
 |
| wow i really need to clean this mirror!! Baby 3 was fast asleep for this picture!! |
Tuesday, September 4, 2012
First "School night"
Yesterday was a relax around the house day, a get nothing done day, a go hang out at target day, and most importantly a get to bed early because tomorrow is SCHOOL kinda day!!!
 I say "okay kiddos tonight is a school night so off the bed" kiddos say "what!?! a school night?" i say "yup you have to get up early in the morning for school so you have to go to bed on time, today was your last day of summer vacation" and then i relish those words for a moment :)
 Last night i was on cloud 9, i was feeling so confident it was strange!?! I guess two years of telling myself i was going to do it, and it was going to be great, had gotten me to
 This morning the kids woke up (a little later than planned) got dressed brushed their teeth and came down stairs to breakfast, it was quite amazing! we got breakfast done with, had a prayer, and started our scripture study lesson, Purchased from here. The feeling was wonderful, my children listened, participated when asked and were read for their school lessons. At this point there was no more second guessing, this is what we are meant to do!
 The Calvert lessons started off pretty slow, we were trying to coordinate between the Boy's courses and the Girl's courses, and it was a little stressful at first, but then it got moving and worked out in my opinion perfectly!! While the Boy was coloring, i was teaching the Girl, and visa verse! when there was a story or poem for either child we all stopped went to the sofa and read it together! Boys pre k lesson was shorter so when his ended with a game, we all played and then he went an played in the Baby's room! then when it was art time for the Girl, Boy participated.

 All in all it was a good day, having my day mapped out for me is wonderful, I'm trying to be realistic and know there will be bad days, but as long as they are outnumbered by the good ones we will be okay!!!
~the Mom
 I say "okay kiddos tonight is a school night so off the bed" kiddos say "what!?! a school night?" i say "yup you have to get up early in the morning for school so you have to go to bed on time, today was your last day of summer vacation" and then i relish those words for a moment :)
Its been a long time coming, a lot of second guessing myself, some soul searching, researching, friends telling me i am going to screw my kids up, other friends telling me i am doing the best thing for my young ones, family saying I'll lose my mind, husband saying he loves me A LOT!!
 Last night i was on cloud 9, i was feeling so confident it was strange!?! I guess two years of telling myself i was going to do it, and it was going to be great, had gotten me to
OMG the mouse!!!!!!!!!
okay where was i... had gotten me to believe it!
 This morning the kids woke up (a little later than planned) got dressed brushed their teeth and came down stairs to breakfast, it was quite amazing! we got breakfast done with, had a prayer, and started our scripture study lesson, Purchased from here. The feeling was wonderful, my children listened, participated when asked and were read for their school lessons. At this point there was no more second guessing, this is what we are meant to do!
  The Calvert lessons started off pretty slow, we were trying to coordinate between the Boy's courses and the Girl's courses, and it was a little stressful at first, but then it got moving and worked out in my opinion perfectly!! While the Boy was coloring, i was teaching the Girl, and visa verse! when there was a story or poem for either child we all stopped went to the sofa and read it together! Boys pre k lesson was shorter so when his ended with a game, we all played and then he went an played in the Baby's room! then when it was art time for the Girl, Boy participated.
 |
| oh how i cant wiat till next year, the Dad said we can change baby room to homeschool room next school year!! |
Art took longer than scheduled because, well who doesn't LOVE art, and we are generally an artsy family! but then it was time for a game to learn propulsion(how to make things go actually, but my word sounds cooler (; hehe) so i set them up with a balloon and some other stuff to blow it around and made lunch!
 |
| scribble art |
Then we ended with a song: I met a little dusty gnome, who said we need to clean our home, Clean our home, clean our home! we picked up our mess and
read books from the reading list and then ::::here is where it really gets crazy:::: we had quiet time!!
I got this idea from a Calvert webinar, the woman said she gets questions all the time on how she can get all 7 of her children to take naps at the same time, and she said she has quiet time, you don't have to take a nap but you have to be quite and in bed for a set amount of time, i think she said 20 minutes. So we implemented a quite time of 30 minutes... every body was quiet including the Baby!! The kids got up after their 30 minutes, but the baby kept sleeping, so i took this opportunity to write this post!

I think tomorrow we will lengthen quiet time, because the boy may very well have fallen asleep, had it been 5 minuted longer, of course i wont tell them it is longer.
 |
| she used shades of blue with a contrasting orannge focal point(mommy help decide color scheme, but the Girl did everything else) |
This all sounds like today went off without a hitch... but it didn't, there were many hitches, and its name was the Baby!! he was being... a baby i guess, and needing mommy and that sort of thing!! it was making it really difficult to concentrate and be joyful, but we persevered until snack time, and then after gorging on a bit of cantaloupe he was in a much better mood and played long enough to give me some one on one time with the big kids!
 All in all it was a good day, having my day mapped out for me is wonderful, I'm trying to be realistic and know there will be bad days, but as long as they are outnumbered by the good ones we will be okay!!!
 ~the Mom
Subscribe to:
Comments (Atom)